Before you make cold process soap, be sure that you have everything you need. A little extra time spent on the planning pays off in the end.
1. Choose your location carefully.
- Your soap making area should be free of distractions, have a microwave or stove, have access to water and have a large, work surface.
2. Protect your area.
- Lay down a protective layer on your work surface. I use a fabric cloth. When it is dirty I throw it in the wash. You can also use plastic. It's cheap, easy to wipe clean so I can reuse it, and oils won't leak through.
- Remember your floor needs protection too.
3. Assemble all equipment and ingredients.
- Set up all your soap making supplies (listed below) and ingredients in a way that works for you.
Keep in mind, however, whatever you confiscate from your kitchen should not be used for anything but soap making again.
a. Your most expensive purchase will be a scale that is accurate to the nearest gram
b. A stainless steel 8 - 12 quart/litre pot, a 2 quart/litre plastic juice jug and one or two mid-size plastic mixing containers (for mixing colour and a small amount of soap to create multi-coloured, marbled soaps).
c. Mixing and measuring utensils - a whisk and/or hand blender, silicon or rubber spatulas (2 would be best), plastic spoons (NOT wooden ones) and measuring spoons.
d. Candy/Meat thermometers (2 - one for the lye and one for the oil).
e. Small lightweight bowls for weighing materials on the scale. I use empty margarine tubs.
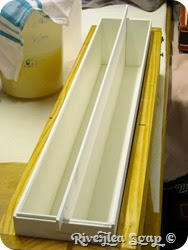
f. Some Wooden soap moulds or plastic soap moulds.
g. Butchers paper/ plastic/ silicone paper to line the soap moulds.
h. Old wool blankets to insulate the soap with.
i. Safety equipment - rubber gloves, apron or old clothes and safety goggles.
j. A thin, sharp knife to cut the soap.
k. One plastic 2 quart/litre juice jug to mix the water and lye in.
4. Prepare soap moulds.
- Line your soap moulds with butchers paper or plastic wrap.
5. Prepare insulation area.
- Lay down folded wool blankets in a warm, draft free area. This is where your cold process soap will cool down for 24 hours.
Step 2 - Preparing your Additives.
When you're first learning how to make soap, it's best to limit yourself to just a couple of additives to begin with. As you become more familiar with making cold process soap, you will be more confident about adding in other techniques.
1. Measure additives and essential oils.
- Measure out any botanicals or colorant you will be using and place them in ramekins.
- Measure out the essential oils, rosemary extract if using, and superfatting nutrients and place them in a small sealed jar.
2. Assemble decorative pieces.
- Using any cold process soap making decorative ideas like confetti soap bits or pebble soap bits? Now is the time to prepare the soap pieces and place them in a container. I have often used clean, empty beer flats. They're free and allow the soap bits to spread out.
Step 3 - Measuring the Base Ingredients.
All the steps in cold process soap making are important but it is crucial that you pay particular attention to measuring accurately. Make sure you are familiar with your scale before you start.
Inaccurate measurements can produce lye or oil heavy cold process soaps which you will either have to re-work or throw out. Learning how to make soap is a lot more fun if you don't have to throw it out!! Make sure you get a good scale....it's the best investment you can make.
1. Prepare the lye solution.
- Measure out your water and place it in the juice jug.
- Before using sodium hydroxide, put on your safety equipment; goggles, gloves and long sleeve clothing.
- Measure your water FIRST, then
- Measure out the lye and add it slowly into the water stirring as you pour. Keep stirring until the lye crystals are completely dissolved.
- You will notice fumes being produced while you are mixing the lye solution. I hold my breath until the lye is dissolved and then leave the area for a few minutes until the fumes disburse.
SPECIAL NOTE: Always add the sodium hydroxide (lye) to the water. NOT the water to the sodium hydroxide. An unpleasant, violent reaction occurs if you do. Kind of like vinegar and baking soda is my understanding.
2. Measure base oils.
- Starting with the solid oils, measure each and place it into the stainless steel pot or heavy duty plastic container.
- Place the pot on the element or plastic container in the microwave at medium-low. As you continue to measure, the solid oils will melt.
- Once the solid oils have melted and before putting the liquid oils into the pot, remove the pot from the element. Add the liquid oils and the grapefruit seed extract (if adding).
3. Check temperatures.
- The goal is to get the temperatures of both the oil mixture and the lye solution to 90-95 degrees Fahrenheit or 32-35 degrees Celsius.
- The lye solution can be heated/cooled in a hot/cold water bath in the sink.
- The oils can be heated on the element/ microwave or cooled in a cold water bath.
- Getting the temperatures similar can be tricky at first but it gets easier as you develop a feel for how long it takes the lye to cool.
Step 4 - Mixing the Oils and Lye.
This is probably one of the most confusing steps when you're learning how to make cold process soap. "How do I know how long to mix for?" and "What is this 'trace' that everyone is referring to?" are a couple of the common questions asked.
In answer to the first question - It can take anywhere from about 5 minutes to hours and hours. The ingredients you use will determine how long you must mix for. Most of my cold process recipes take about 5 to 10 minutes to trace using a stick blender and whisk alternately.
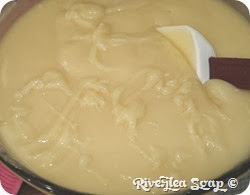
The second question: trace is when a “trail” of soap is left on the surface of the mixture.
1. Combine lye solution and oil mixture.
- Slowly pour a thin stream of the lye solution into the pot of oils while using the whisk to stir the mixture.
- Maintain a steady, strong stirring motion. Stir fast enough to keep the mixture in constant motion but try not to splash. The idea is to get the oil, lye and water molecules to meet and combine to make soap.
- Make sure to stir thoroughly all areas of the pot. The mixture will turn creamy and opaque
(like condense milk) and begin to thicken.
2. Stir mixture until it begins to trace. Pictured above
- Keep stirring until the mixture reaches a thin trace.
- Remember - just a thin trace at this point. We still have some ingredients to add yet.
Step 5 - Additives and Pouring Soap.
1. Incorporating additives.
- Mix in the additives, starting with the ramekin of colour and botanicals. Next, stir in your jar of essential oils and nutrients and anything else if you are adding.
- You will have to work quickly while mixing since some of the ingredients may speed up the saponification process causing the soap to become too thick to pour.
2. Pour the soap.
- As soon as the ingredients are mixed in thoroughly and the soap is showing a good trace, pour the soap into your soap moulds.
- Carefully take the filled moulds over to the location you will be insulating it at.
- Place the moulded soap on the wool blankets. Make sure there is enough of the blanket on either side to wrap around the soap moulds.
- Fold the blankets up around the soap making sure it is well wrapped.
***NOTE***Insulating may or may not be needed depending on how hot the weather is, the recipe used, the temperature that you mix at and what type of mould you use! A lot of factors contribute to how hot the cold process soap will get so you will need to keep an eye on your soap for the first few times until you are familiar with what works best for you.
3. Clean-up.
- Cold process soap must be left for about 24 hours or until it reaches room temperature. Your soap should have a smooth, creamy, even appearance.
- While cleaning up, be sure to wipe all pots, bowls and utensils with paper towel first to remove as much of the oil and soap as possible. They are not kind to your drains.
Step 6 - Cutting and Curing.
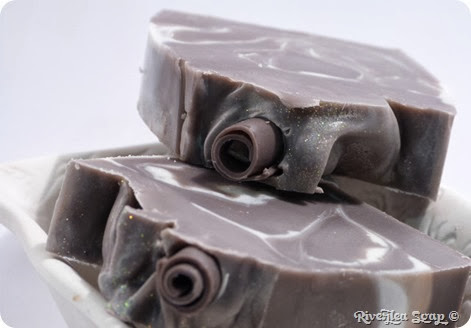
The next 24 hours will feel like an eternity. You finish making soap and are anxious to see what the final result will to be. You will notice the soap going darker and having a clearer look to it. This is called the gel stage. Once your soap reaches the gel stage you can start to take off some insulation to prevent overheating.
1. Unwrapping.
- You've waited about 24 hours, remove the soap from the mould and take off the butcher’s paper. Place the soap on a piece of paper.
2. Cutting.
- You can either cut the cold process soap into bars now or wait a few days for the soap to firm up.
- I use a soap cutter (made by a friend) that requires you to push the soap block through a thin wire, so I prefer to wait and not damage the soap while it's too soft. We will have more on making a soap cutter later.
- If you are using a knife, this might be the best time since the soap is very flexible right now.
3. Curing.
- Once you have cut the soap into bars, they need to cure for about 4 - 6 weeks in a cool, dry, dark location.
- Place them in a single layer on a beer flat or tray lined with paper towel. Turn them each week so that all sides are exposed to the air.
4. You have now finished – until next time. It is a little addictive!


Thanks for the great tutorial! I'm thinking about trying CP soaping for the first time soon, and I'm trying to learn as much as I can. Thank you for all of the tips and information!
ReplyDeleteKeep watching we will post new and fun recipes as the year progresses.
ReplyDeleteThanks for this post. I started my hand in soapmaking about 9 months ago. Something that always bothered me is the lye. I can only fins Tridan Caustic soda, where I live (i the NW province. Is it NaOH or KOH? There is nothing on the label.. :-(
ReplyDeleteHello,
ReplyDeleteI noticed that the majority of this page has been copy and pasted from my website, www.soap-making-essentials.com. Please be kind enough to at least provide a link to my site at the start of your blog page that gives credit to my long hours of hard work that you have simply copied and posted as your own.
Thank you for your consideration,
Cathy Winsby
Thank you for sharing the information.
ReplyDeleteEveryone in the world wants to look beautiful and for this purpose people are using different kinds of soaps and cosmetics to get a beautiful and glow skin with a good fragrance in it. Now a days, various types of soaps are available with different fragrance, color, shapes, sizes and the most important is now a days, it has also become easy to make soaps as many companies are providing the soap making supplies and one such company which, I recently came across on internet is camdengrey.com who is providing different types of ingredients for making soap and toiletries as well as soap bases and essential oils that are being used in creams, lotions, balms etc.